Stats

29.9.15

Starting AutoCAD in Safemode

A common problem when troubleshooting AutoCAD problems is narrowing down the source of your headache. A handy tool is adding a /SAFEMODE switch to the AutoCAD shortcut. This works for Civil 3D and every other AutoCAD based vertical 2013 or newer.

Starting AutoCAD in safe mode blocks all executables from running on top of AutoCAD. It prevents any LISP routines from running.

When AutoCAD is in safemode, most of the base functions will work, but Express tools will not. Express tools are mostly LISP routines.

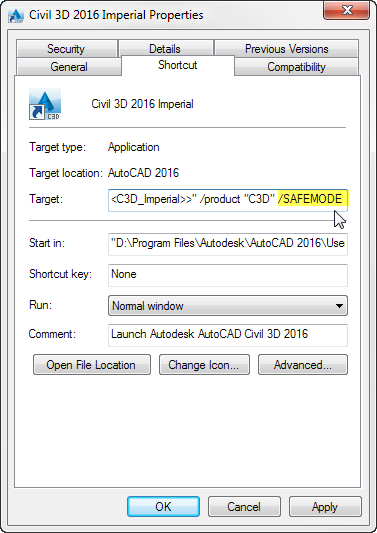
To start AutoCAD in safe mode, edit the properties of the icon. Add /safemode at the end of the Target path.


Here are some examples of problems I've solved with this method:
A customer contacted us reporting Civil 3D crashing every time he tried to use the Capture Area command from the Geolocation tab. It turned out that there is a conflict with Projectwise and AutoCAD. By starting in Safemode, he was able to capture the map. Yay, workarounds!
A second customer was trying to get AutoCAD to recognise his custom acad.pgp. His support file search paths were set up correctly (the pgp file was located in a support folder at the top of the list). When he sent me a screengrab of his support file search paths, I noticed he had a directory in there called LISP. Hmmmmmmmmmm, LISP? He started in safemode and AutoCAD recognised his PGP as expected. So now his assignment is to find the LISP that was overriding his PGP file. These were all custom LISP files; none of the OOTB lsp files would have this problem. 

28.8.15

Dispatch from Support: Unit Settings in Autodesk ReCap 360

ReCap is a new-ish offering from Autodesk which debuted in spring 2013. I'm still learning the ins and outs, but so far it is very intuitive. The scope of the product very focused on processing laser scans and passing them to other Autodesk products. ReCap Photo is a related tool that can make 3D models from photos.

lasers!


Today I had a question from one of my users that I was a little embarrassed not to know off the top of my head. "Where do I set the project units in ReCap 360?"

By default, a new ReCap 360 project will start up in meters, but it is quite easy to change.

1- Go into Preferences


2- Set the project units to feet.

3- Once feet is set, you can choose foot types of International or US (meaning US Survey feet).

I recommend clearing the checkbox for "auto appropriate unit." If you keep that setting on, you'll get feet and miles as units (which might not be relevant to your project.)

Then click OK. No scaling is performed.

ReCap stands for "reality capture," but today is Friday and I'm about to let go of reality for 50-some hours! 

26.8.15

"Is it Me, or is the Cloud Down?"

Did you know there are public websites where you can check the status of the Autodesk cloud service you are trying to use?

Bookmark these!
  • https://health.autodesk.com/ is a site that reports the status of many of the most highly used Autodesk 360 products. You can sign up for status change alerts for your favorite services. 


If you are wondering why Infraworks 360 or ReCap 360 are not in the list here's why: Infraworks and Recap use a mix of the services listed on those pages to do it's thing. Signing in and getting your entitlements is done by the Identity and Accounts server, Oxygen (that's true of all of the web services that require sign in). If you run a profile optimization in Infraworks or create a 3D photo model in Recap, the computations are performed by a different server. Your online models are stored on another server (check Nitrogen if you are having trouble accessing online models).

Knock on wood, unplanned service outages are pretty rare. If everything looks good in the above web pages, the next step is to look at your connectivity to the outside world. 

13.8.15

How to Make Your Autodesk Deployments Portable

Here is a case I had WAY too much fun with. A CAD manager at one of my customers wanted to copy deployment packages to various local offices. The problem with that is the servers have different names so moving a deployment renders it useless unless you know which files to tweak.


 If one were to move a deployment image there are a few files that hang onto the path location.

  1. The target in the properties main shortcut used to launch the installer. (the shortcut circled above)
  2. Paths inside the ini file (in this example it will be in the img folder and called Infraworks_360_16.2.ini)
  3. Paths to modify the deployment. This is optional, but handy to have ready to go.
In this example I'm showing an Infraworks 360 deployment. However, this technique will work with most Autodesk product deployments.


  • So, instead of using the shortcut to launch the deployment, use a batch file. The batch file is short, but sweet and looks like this:

%~dp0Img\Setup.exe /W /q /I Img\Infraworks_360_16.2.ini /language en-us

%~dp0 means "use the current folder"
img is the next folder to look in. Note that there is no space between the %~dp0 and the Img
Setup.exe is the installation executable
/w means wait for any other installers to finish
/q means quiet (no dialog boxes except for a progress bar)
/I means install


  • Once you have the batch file, you can delete the original shortcut if you wish.
  • The last required step is to modify the ini file. Go to the IMG folder and edit the ini file with your deployment name (in my example Infraworks_360_16.2.ini ).
  • Scroll down to the Global MSI Properties Area
  • Remove the path to the Admin Image. You can delete this because it is only used when creating new deployments.
  • Change the path to the Network log to %tmp%

  • Save the ini file and that's it. 


If you want, you can also create a batch file to replace the Create & Modify a deployment shortcut too. The new deployment you create will be created in the same location as the one you are working with.
If you are a real stickler, you can use the same techniques to modify the path to the update tools in the ApplyUpdates folder. I find it much easier to manually run AdAppMgr.exe from ..\IMG\Setup\AdAppMgr\ but this is what it would look like if you want to make a batch file:
Because I kept all of the install tools in their default directories, I needed to use %~dp0..\..\ to tell the batch  file to look 2 directories up.

At this point you can move the deployment package to any server or USB drive without If you try this, I'd love to hear your feedback on how it worked for you. 

Special thanks to Richard H. for his ideas on doing this. 


3.8.15

Dispatch from Support: Does Infraworks 360 Account for the Curvature of the Earth?

Infraworks does take into account the curvature of the earth, BUT it does not compensate for that when importing a large FBX or other 3D models. For example, I had a support case for a user that had a single FBX that contained an entire city's worth of buildings. He noticed that buildings far from the basepoint appeared to "float." It turned out that the ground had curvature but the 3D model did not. The workaround is to break up the 3D models into multiple pieces to avoid running into the curvature of the earth. 

engineering would be so much easier with a flat earth
The curvature of the earth also impacts Infraworks users if you are working in a custom coordinate system with Civil 3D. If you are used to Civil 3D, you may know that the curvature of the earth is completely ignored in any AutoCAD based product. If you are using an out-of-the-box, real-life coordinate system, the ellipsoid is taken into account when transferring data to Infraworks (e.g. adjustment to work with the curvature of the earth happens automatically). However, if you are working in a custom coordinate system in Civil 3D and are pushing it out to Infraworks there is no ellipsoid to adjust to, therefore you may see coordinate weirdness in large models.  

Custom coordinate systems make my brain hurt. I recommend avoiding them altogether, especially if you are using Infraworks. This goes double for large models, where you will see the effects of a curved Infraworks world.

Tschüss!


27.7.15

Where the [BLEEP] Did My Download Options Go?!

Back in March, Autodesk rolled out it's new subscription management site manage.autodesk.com. From a user interface perspective, it is a much more logical layout and you can actually search for products now.

There are many improvements, but one of the things that annoys the ever-lovin' stuffin' outta me is that the download options are more difficult to find for some products. The website encourages people to use the "Install Now" feature for many products.

I'm not a fan of the "Install Now" option for several reasons. When using this option, the install downloads files as it goes. For products with smaller installation media, that's not a problem, but some products are kinda big. The Install Now option requires you to be connected to the internet for the duration of the install and stay logged into your Autodesk account. If something fails or your connection times out, you need to start over.

The best way to download Autodesk products is with the Download Now tool. You can also use the Browser Download, which uses your web browser's download manager rather than the Akamai one (Akamai is the third party web delivery service that manages Autodesk downloads). Both of these options pull the entire installation package to your hard drive.

For some products, you can find the additional download options in the More Options menu.

However, many products don't have those options. Grr. To find them, you have to dig a little deeper.

Scroll alllllllll the way to the bottom of your products listing. You will see a button that says Download Products.

This will bring you to an interface that looks more like the old subscription site. From here, you will be able to find the Download Now or Browser Download option for your product.

More tips for downloading your product install files:

  •  Make sure you get all pieces. (Turn off your web browser’s pop-up blocker temporarily to ensure you download all the files). 
  • Pay attention to the name of the file. If you see that the name of the exe ends with 001_003, that means your are looking at one of three separate downloads needed.
  • If you grabbed the correct files, you will see “dlm” as part of the name. That stands for download manager.  You will see "dlm" in both the Download Now and Browser Download obtained files. If you wee "wi" in the file name, that means you have the web installer which contains a portion of the files you need. If you try to run the Setup.exe from a "wi" folder, you will receive a Communication Failure message. 
  • Save all the needed files to a directory on your hard drive. These are the files that will be extracted and used to start the deployment. (In the “old days” these would have come on a CD).
  • After all pieces are downloaded using Download Now option, the exe will try to self-extract. Your computer’s settings may prevent EXEs from automatically running, in which case you will need to browse to the folder where you saved it and double click. If you used Browser Download, you always need to double-click the exe to get the extraction started.
Have fun downloading!

21.7.15

Etcetera (Totally Random, and Maybe a Little Icky)

This crazy poem popped into my head last night. I hadn't thought of it in YEARS, but the following is a poem that I learned in my college wastewater treatment plant design class. At the time I remember thinking, "Like, oh.mah, gawd. So gross!"

Milorganite is a commercial product sold by the Milwaukee sewerage district (MMSD). It is the concentrated, heat-sterilized organic material left over after the wastewater sludge removal process (eg dried poop). Milorganite is short for "Milwaukee organic nitrogen" You can pick a 36lb bag up at your local garden store for about $15. MMSD essentially breaks even on it after the cost of making it minus the cost of not sending the sludge to a landfill.
Milwaukee is a land of cheer,
German cooking, ale and beer;
They eat and drink from morn' 'til night,
And then they make Milorganite
Their ball team is quite their pride,
It's fame has traveled far and wide.
The grandstand has a place in sight
Where they can  go and make Milorganite! 
After the game they go to dinner,
It does not matter whose the winner;
And after sleeping through the night,
Start making more Milorganite!
I state without equivocation,
This chore has keen cooperation;
It's manufacture is an art,
Where everybody does his part. 
Old men, young men, perfumed ladies,
Boys and girls and even babies;
Grunt and strain and do what's right,
To pile up more Milorganite! 
                                          -Author unknown (NOT me)

A poem. Now we're all culture-ified! 

15.6.15

2016 Install Workaround: Navisworks Updates Won't Append to Network Deployment

In most Autodesk products, the page where you can choose to download a service pack or add an MSI has been replaced by Autodesk Application Manager (AAM).


For Navisworks 2016 (all flavors: Manage, Freedom and Simulate) the AAM doesn't pick up the updates for some reason. You'll see an empty screen that reads, "Your Autodesk Software is completely up to date - there are no updates needed."

This is a known issue and luckily there is a simple work-around.

When you create a deployment, you will see an Img folder with the reset of the deployment stuff. Inside the Img folder you will see an INI file who's name matches the deployment name. For example, if I create a deployment called Navis_Man2016, there will be a corresponding file called Navis_Man2016.ini.

Open this file in Notepad. In this file locate the section:

#==================== Autodesk Navisworks NW

[NW]
PLATFORM=x64
At the end of this section (before the language pack area), add the following line:
UPI=NAVMAN&2016&ENU64&13.0.1237.08

Believe it or not, that's it. After making that change to the INI, your deployment will recognize what version it is, therefore it knows what updates to grab from the internet.

For Navisworks Freedom 2016 and Navisworks Simulate 2016, you will do a very similar thing.

Find the sections:
#==================== Autodesk Navisworks Freedom

[FREEDOM]PLATFORM=x64

and add:
UPI=NAVFREE&2016&ENU64&13.0.1237.08 

For Simulate find:
#==================== Autodesk Navisworks Simulate

[FREEDOM]PLATFORM=x64
and add:
UPI=NAVSIM&2016&ENU64&13.0.1237.08


Such a small line to fix such an annoying issue. 
Enjoy. 

8.5.15

My Love Affair with Revo Uninstaller

Installing software on Windows is like ripping open a feather pillow in a wind tunnel. You can tell where many of the files go, but there are hundreds of registry entries, user-specific files and other files that seem to get stuck in the unseen corners of your computer.

A common solution to Autodesk software problems is to "uninstall and reinstall". Running the traditional Windows uninstaller from Control Panel > Add/Remove Programs really only uninstalls a small portion of the product. As a support person, we often tell people to do a "complete" uninstall. I find that people either, 1) Don't know what I mean exactly, or 2) Lie about it, thinking I'm just making them do extra steps to be sadistic.

A true, complete uninstall involves:

  1. Running the uninstaller.
  2. Manually deleting the following 
    • C:\Program Files\Autodesk\Autodesk AutoCAD Civil 3D 2014\
    • C:\ProgramData\Autodesk\C3D 2014
    • C:\Program Files (x86)\Autodesk AutoCAD Civil 3D 2014
    • C:\Users\[user login]\AppData\Roaming\Autodesk\C3D 2014
    • C:\Users\[user login]\Appdata\Local\Autodesk\C3D 2014
  3. Go to REGEDIT.exe
    • Verify that the following keys were removed:
      • HKEY_CURRENT_USER\Software\Autodesk\AutoCAD\R1#.#\ACAD-D000:409\
      • HKEY_LOCAL_MACHINE\SOFTWARE\Autodesk\AutoCAD\R1#.#\ACAD-D000:409\
    • (If the uninstall completed successfully, these should already be gone - but I always like to check *just* in case.)
  4. Clear the contents of the %temp% directory.
Even following those steps may not be enough. If you search your registry for the product you uninstalled, there are still many cling-ons. Additionally, doing all those steps is a huge PIA. That is where Revo Uninstaller Pro comes in. 

Revo is worth the license fee of $30-$70 (depending on what version and how many licenses you buy) because it cleans all the leftover files and registry entries automatically. Even if the program does not appear in Add/Remove programs, Revo Uninstaller will find it. It's like a high-colonic for your registry. 

A feature I use frequently is the Quick Uninstall tool. This allows you to pick a bunch of programs at once and uninstall them as a batch.
You do need to stay close by to keep hitting continue, however. It does not delete or uninstall anything without verifying twice. 

There are three modes; Safe, Moderate and Advanced. I recommend sticking with Moderate. With Autodesk products, Revo will delete the Autodesk Shared stuff if you set this to Advanced, and you don't want that; it will break other products you have installed alongside the one you want to obliterate. 

The best part comes when it gathers leftover registry entries, files and folders. It is so satisfying to select all those checkboxes and click DELETE!

There isn't anything that Revo does that a half-way decent IT person couldn't do manually (or script out if they are 3/4 decent), however it is a lovely convenience. 

For those of you in large organizations that want to uninstall stuff using SCCM or similar, Revo has command line support

My $0.02. I'm not getting any kickbacks from the Revo people for writing all this (although if you happen to work at Revo and want to pat me on the head for endorsing your product, I'd love a free copy of the Revo Uninstaller Pro Portable!), I genuinely like the tool and have used it for years. 


24.4.15

Dispatch from Support: Civil 3D is Slow

Minimum requirements for Civil 3D is 4 GB ram. Even though the recommended is 8gb, my personal recommendation is 16gb (32 if people will be working with LiDAR data / 3D scans).


Having said that, the two most common causes for poor performance in Civil 3D are: a) poor data management b) attempting to work off a WAN.
  1. If users are not already, it is imperative that they start using Data Shortcuts. This is a huge help in improving data management practices.
  2. If they are working from a WAN, test to see if the performance improves if the project is copied local.
    • Both Vault and Projectwise eliminate this problem by temporarily copying files local as the user works.
  3. Make sure the Civil 3D level of detail setting is on. The command line entry for this is LEVELOFDETAIL.
  4. Set the WHIPTHREAD setting to 3
  5. Turn off tooltips (this often helps a lot). ROLLOVERTIPS = 0
  6. If any support file search paths (in AutoCAD options area) are looking to the WAN for resources, this is another huge slower-downer. 


Here is my artist's depiction of working with CAD files across the network. I call it, "Needing Better Data Management."


This wasn't part of my earlier email, BTW. Just a doodle that expresses how it feels to work on a HUGE file over a WAN and/or without good file management in place.

It's a good thing I'm an engineer 'cuz I suck at art.

15.4.15

Dispatch from Support: Parlez-vous Civil 3D?

Today one of my customers asked about installing a French language pack for Civil 3D 2015. And here's what I found out:

Civil 3D 2015 (and other releases) does not have a separate language pack installation.  With Civil 3D you need to download the entire installation package in the language of your choice. The same is true with Map 3D.

The following products DO have separate language packs that can be installed after the regular deployment/installation:

“vanilla” AutoCAD and AutoCAD LT
AutoCAD Architecture
AutoCAD electrical
AutoCAD Mechanical
AutoCAD MEP
Autodesk Inventor
AutoCAD Structural Detailing
Autodesk Revit Architecture/Structure/MEP

For the above list of Products, go to Help and find the link to Download Language Packs.


For most other products, a separate download is needed.


Some products such as 3DS Max* and Autodesk Advance Concrete*, and Infraworks 360* there are multi-lingual downloads in manage.autodesk.com For multi-lingual products, there will be a screen in the installation/deployment creation where you pick the product language.


*There are other products that have multilingual installations, but I didn't comb through the list to find them all.

9.4.15

Autodesk 2016 Product Compatibility and Microsoft Windows 10

NO

UPDATE 2016-03-31:
Installing the most Autodesk product service pack for your product is all you need to have the 2016 products run on Windows 10.

16.3.15

A Quickie Dispatch from Support: Adding Pressure Pipes through Content Editor

The funny thing about pipes is that they have 2 ends.

If you are adding pressure pipes via the Content Catalog Editor and you happen to get the following error, "The following columns are required: 'Outer Diameter (mm),' 'Nominal Diameter (mm),' Joint End Type ID.' Please fill in the valid values and continue."

Don't forget to fill in data for both end of the pipe!


5.3.15

Taking the "Wahhh" out of WAN


  • Is saving a large design file across a WAN (wide area network) supported? 

<grumbling> Yeahhhh...


  • Is it a good idea to do this without a data management plan? 

NO!

Whether you are working in Revit, a flavor of AutoCAD, 3DS Max or other product that creates a large file, you are setting yourself up for poor performance when saving this file to a server that is not local to your office.  Even though the workflow of saving a CAD file to a remote network drive is not explicitly unsupported, it is generally a bad idea.

One of the biggest hits to performance when working in AutoCAD-based stuff is trying to actively work off the WAN. Even with a WAN accelerator like Riverbed, the performance can be frustrating to an end-user. The farther you are physically from the server in question, the slower your experience will be. There are lots of other factors are well. If you are interested, here is a fun latency calculator by Silver Peak (another WAN optimization company). 

Look to possible network issues if you experience one or more of the following symptoms:  
  • Poor performance 
    • long save times
    • sluggish mouse, especially if rollover tooltips are on
    • slow to change views 
  • Crashing on save, autosave or other mundane activity
    • The old "I just walked away for a minute and it crashed!"
    • Freezing when viewing 3D objects
  • Revit "File Not Saved" or other "Unable to Synchronize" messages
  • "Locked for Edit" messages for files that for sure were not in use by other people.
You'll know you are running into this issue when you copy the project locally and the problems magically go away. 

So what to do?

GOOD: Go to the Cloud!

If you are an Autodesk customer, you already have Autodesk 360. This is a cloud storage solution that is built into Autodesk products. You will want the desktop sync app as well.

Similarly, you could use a service like box.com, dropbox.com or Panzura that allows you to work from a local folder and contnuously sync.  The service will create copies of files if there is a version conflict. These services are relatively inexpensive but are not ideal for fast-paced projects where XREFs are updated frequently.

The best use of cloud sync services if for storing shared resources. For example, this would be a great place to store linetypes, fonts or template files.  The caveat is that the pathing to the sync folder must be identical between multiple users.


BETTER: A Data Management Tool

Use a data management program like Projectwise (Bentley) or Vault (Autodesk). Both of these products manage the file a person is working on by temporarily (and without the user realizing it) copying the file to a local drive.  In this case I'm talking about projects themselves rather than resources. 


BEST: Virtualize!

Don't pull your data to you, go to your data.

There is a big push to get Autodesk products tested in virtual environments. Most of the more widely used products are now supported on Citrix XenApp 6.0 or higher. Here a handy list: http://usa.autodesk.com/adsk/servlet/item?siteID=123112&id=13959101. I know of people using virtualization tools other than Citrix, but currently those are not supported (yet). 

If I had a nickel for every support case I've ever taken where the problem stemmed from storing files on a remote network, I could buy a venti skinny vanilla latte.

20.2.15

Etcetera: Doodling on Conference Calls...


Some of my least favorite cliches from conference calls. After I made this and showed a few of my co-workers they gave me a ton more ideas. I might just make a little BINGO randomizer app. 

TGIF

30.1.15

Dispatch from Support: Controlling the UNDO Command

You might be wondering how on earth I have time to be blogging so much this week. Well, these "Dispatches from Support" are little how-tos that I've written up for my Enterprise Priority customers. With minimal tweaking I can one-button publish from MS Word 2010 to Blogger.

The Question:

My UNDO command seems to be misbehaving. Every action is accounted for when I try to UNDO. For example, if I create and object, pan with my middle mouse wheel and then and to undo the creation of the object I have to hit undo 2-3 times! With Civil 3D it seems even worse!

My erudite answer:

The behavior of UNDO in Civil 3D uses the same settings as AutoCAD. In all versions of AutoCAD panning and zooming are considered actions so you will always need to undo several steps if you have panned between actions. 


There are few things that will help you.  First, in the AutoCAD Options area, make sure that the options for “Combine zoom and pan commands” is checked. 


Also, when using UNDO, you can undo multiple actions by using the pull-down menu in the Quick Access Toolbar. Many Civil 3D commands will result in a “Group of Commands” entry in the UNDO list because the Civil 3D portion of the program is performing multiple tasks. Inellizoom and Intellipan are the listings seen when using the middle mouse wheel for panning and zooming actions.


Lastly, typing UNDO (the full word, not just U) at the command line will offer additional options. By default, the All option should be on, but you can use the options in the UNDO command to set a mark so that you can quickly get back to a point in time earlier in your AutoCAD session.

Many users have expressed the wish that panning and zooming get ignored altogether in the undo command. I hope that in the future this could be an option, but for now multiple UNDOs are usually necessary. 

28.1.15

Dispatch from Support: "Vanilla" AutoCAD vs Civil 3D Scaling

Users Question (slightly modified to protect the innocent):

I do not fully understand is the relationship between AutoCAD and Civil 3D as it relates to scales.The Issue: When a drawing file is created in AutoCAD with mm scale and is opened by a user running Civil 3D the scales get messed up; blocks, text, linestyles all related elements seem to be affected. 

My sage answer: 

Your question is not uncommon. Civil 3D can only create objects in feet or meters. The below screengrab is from the Civil 3D drawing settings. 

However, Autocad can work in any units. The following dialog box can be found by typing UNITS in the command line. These are the base AutoCAD units.


When you open a drawing in Civil 3D where the base AutoCAD units are not meters, it still creates roads, topography, and all other Civil 3D objects as if you are in meters. As a result, you will have scaling issues.  A road that should be 6 meters wide will only draw in as 6mm. 

The reason blocks, linetypes and text get goofed up is because of  Annotative scaling. If you open a base AutoCAD file in Civil 3D, it will not have correct scales set up to display properly relative to the large size of a civil jobsite.  A typical drawing scale for a metric civil project might be 1m=2000m plotted. When working in mm, typically you are plotting closer to 1mm=1mm. 

The best way to work with Autocad and Civil 3D is to XREF the Autocad drawing into Civil 3D (or vice versa).  The XREF command recognises that the files are created in different scales and will adjust the file accordingly. Similar scaling will occur if you insert the AutoCAD file into the Civil 3D file as a block. I recommend XREF over block insertion because the files remain separate and can be edited by multiple users.  


Additional problems will occur in Civil 3D if the file originated in base AutoCAD and is opened directly.  A base AutoCAD drawing does not have the Civil 3D styles that control the layers, colors and display of Civil 3D objects. 

If you absolutely MUST edit a file that originated in base AutoCAD in Civil 3D, you can do so but you must be careful to change some settings and change them back.  

First, make sure the Civil 3D styles are present.  If you start with a template (DWT) intended for Civil 3D, that will retain Civil styles. If it is too late, and you've already made progress on the base-Autocad file, you can use the IMPORTSTYLESANDSETTINGS command or, better yet, start a new file from a Civil 3D template and insert the AutoCAD file as a block. Explode the block upon insertion.  I like the latter option for getting at the Civil 3D styles better because expressions don't come across in the IMPORTSTYLESANDSETTINGS command. 

Keep in mind that base AutoCAD drawing tools are unitless. Changing the unit type in the UNITS dialog does not scale the objects.  If I draw a polyline and tell the software that it is to be 6 units, the size of the object in that drawing are relative to other objects. AutoCAD doesn't care if I mean 6 mm, 6 feet, 6 meters or 6 light years! The only time AutoCAD pays attention to the units specified in the UNITS dialog box are when you are using the XREF or INSERT command.

I hope this helps. 

22.1.15

Dispatch from Support: "Not enough free RAM for HIDE--some lines will be hidden incorrectly."

Today one of my users got the error in AutoCAD 2014: Not enough free RAM for HIDE--some lines will be hidden incorrectly.  

This was on a brand new laptop with 16 gig of RAM. In the support request, the user did not mention the make or model of the video card, but my suspicion went directly to it.

Here is my answer to the problem:

The most likely cause for the error you are seeing is the graphics card. Knowing that the new machine is a laptop, I'm concerned that the video card that is being used does not meet the hardware requirements for Autocad 2014.  In the following link, you can check to see if your graphics card is supported.  http://usa.autodesk.com/adsk/servlet/syscert?id=18844534&siteID=123112

If you find your card on the list, check the recommended driver version against the installed driver version. **It is important to note that the recommended graphics driver for use with AutoCAD is not always the most recent one that Windows update automatically finds from the manufacturer.  Your IT folks will need to log in as admin to change the graphics driver.


If the graphics card and driver both check out as supported, the next thing to check is that you are using the dedicated graphics card and not the onboard graphics. Right-click the shortcut to find the Run with Graphics Processor options as shown in the below image:

Be sure AutoCAD is using the dedicated graphics card and not the integrated card.

If your video card does not appear as one of the supported cards, or if you only have an integrated graphics card, you will likely see other performance and graphics "quirks." The good news is that there is a work-around for your specific issue. In Autocad, you can work in the 3D wireframe visual style (rather than the default 2D wireframe visual style).


So hopefully that did the trick.